Thursday, September 23, 2010
Sewing Room Spool
Here is another storage solution for all of my laces, elastics etc. Currently they are all in a drawer and I can't seem to find anything that I need when I need it. I had left over wallpaper that I inlaid into the centre of my upper cabinets. So I decided to use old cds and pvc piping and cover them in the wallpaper. Looks like what I had in mind. Now, not only it is decorative it is also green and useful. I could have also use left over rolls of parchment paper instead of pvc pipe, however I needed a lot of them, and I only had one roll left over from the parchment paper.

Tuesday, September 21, 2010
Spiderman - hooded sweater

Sunday, September 19, 2010
Sewing Room Completed
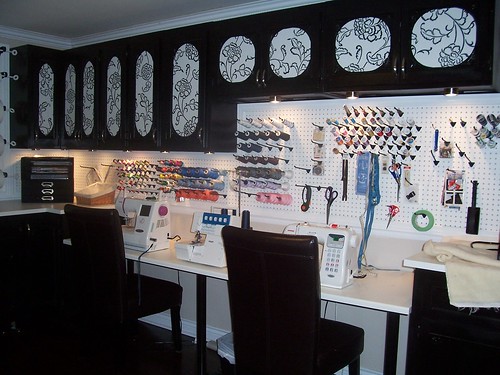
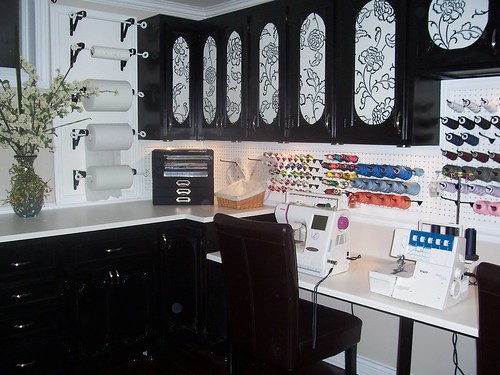
My sewing room is finally completed. I absolutely love it. I owe it all to my wonderful hubby. Thanks hun!. All I have left to do is tidy up a bit and get some rubber mats for under the heat press.
Saturday, September 18, 2010
Sewing Room update
Tonight was a long night and we got everything done. We sand and touched up the trim, bolted the machine table to the wall, installed holes for the wires in the machine table and applied covers, finished installing the embroidery stabilizer holders, painted all the kick plates, tidy up a bit did the first over vacuum. Now all that is left is to secure the entangled lights wires and to organize. My hubby made a joke about how it should be finished in about another month with the way that I like to organize. Seriously, this is the best part for me. I am the most ocd person I have met when it comes to organization. Finally a little part of my home can be as ocd as I am. Where to start? I have a lot of left over wallpaper, so I was thinking of using it to cover over some tin cans for storage and put them on my ample pegboard board that my hubby so graciously installed. Maybe I'll use some empty cereal boxes for magazine holders or maybe sew some up. Oh, how the possibilities are endless now.
As for lights. Like I said in a previous post we installed a plug-in style from ikea, hiding it behind the pegboard. To assess the lights on and off switch, I will be using our x10 system which we bought for our halloween display before we had children. It plugs into the wall and then you can plug in a device (such as a light) then you use the remote control (wirelessly) to turn it off and on with. I have seen these types of things at the hardware store under different names, however the x10 you can set up to operate using computer software from say your work. It really is neat but I have to admit that the website makes you think that it's a scam as it's really cheesy looking. I'll post pictures once I get everything where I like it. I wish that there was more time tonight to finish everything but ds1 peed the bed and I had to wash his security blanky and the world was coming to an end for him, plus ds2 decided that he wanted to stay up and watch mommy. I finally realized that he wanted to play the pick me up and hold me game for the last hour. Our first son played that game for the first 6months, finally my hubby and I were so tired that we started to let him cry it out (which broke our hearts) but eventually after 15mins of (light) crying (not the screaming kind of crying) he would fall asleep. Within a week of doing this he would fall asleep as soon as he was put into bed. But tonight was the first time I have ever let my ds2 ever cry it out and it broke my heart. I knew that he was playing with me but it doesn't make it easier. Some may disagree with this (I did too) but sometimes kids and babies toy with our need to baby them and sometimes they take it too far. We all have limits. Sleep deprivation is definitely one of them.
Friday, September 17, 2010
hooded sweater binding
This is the pocket binding to the hooded sweater that I'm in the midst of completing for my 2 year old son. It has a "spiderman" theme. I applied the binding by sewing (already sewn and turned circle) to the shirt with right sides facing. I used the overedge stitch on my sewing machine to have a nice finished edge on the underside (not that anyone would know or not). Then (after this photo) I turned it inwards, and topstitched it down. It turned out nicely.

Thursday, September 16, 2010
Ottobre / Coverstitch Machine


I have recently purchased a long awaited subscription to Ottobre design (sewing) magazine. It's main focus is on children's fashions, however they have added a woman's magazine too. Each issue has 40 designs with patterns. I also added a few back issues as well. I love the results of these patterns. Given it's a pain in the a** to trace them out but the results are beyond stunning. These magazines have come in handy when I have needed a Birthday present for someone's b-day but don't have the money to buy one. My current project, (along with finishing the sewing room) is the above issue 4/2007. I am doing the hooded sweater picture to the right of the issue. If there is one thing I hate doing in sewing it would have to be applying binding. It took me a while to figure out how apply the binding to the circular pocket opening so that it didn't look amateur (despite reading ottobre's directions, I didn't like the result). {Yes I really am that anal that I will rip and tear it out until I'm satisfied with the results. I feel that it's the only way to do something!}
Luckily, (and to my surprise) my dear hubby already told me that he is going to buy me a long awaited coverstitch machine with his overtime check, for Christmas. I really wanted to get the Janome coverstitch machine but my cheapness was leaning to the brother coverstitch machine for at the time $299 us dollars now it's gone up to $350. For those of you who are wondering what the heck is a coverstitch machine, it's a machine that is designed to finish knit fabrics. If you look at a ready-to-wear tshirt, for example, it is the bottom hem of the shirt where there are two or three rows of stitching on the top. It is also added on a lot of rtw tops now for decorative stitching in place of topstitching. Coverstitch machines also do chain stitches which are used as a decorative or basting stitch. They aren't cheap by any means but they give you great results, and if you're like me perfection is what I strive for in everything I make (although it might not be perfect, it's my goal). The coverstitch can be copied by using a double needle but it will never be a true coverstitch and thus the stitches can break. With a coverstitch machine you can apply binding and elastic, in one easy step. Which is just what I wanted as I would like to make underware and tshirts etc. I do have a coverstitch option on my pfaff serger, however it's driving me nuts to change from a 4thread stitch to a coverstitch back to a 4thread stitch. Plus the bed size of my serger is tight not to mention that there isn't too many options for binders (to apply the binding). My machine only will do a 2 needle narrow coverstitch and I would really like a 3 thread coverstitch. Both the brother and janome where on my top picks. I found a place on ebay that sells generic binder attachments. These generics attachments are compatible on both machines but the brother requires (in my opinion) a mickey mouse way of attaching it to the machine and that is by using mack tack to stick it to the machine. After hearing me hum and haw for over a year now (not that I really had the money anyways), my hubby said I was driving him insane and that he was just going to go out and buy me the Janome. I already own a Janome embroidery machine and sewing machine, both are excellent machines and well worth every penny. I know I have a lot of money tied up in a "hobby" but sewing means a lot to me, and I know that my hubby knows that. Plus I don't smoke and I don't drink or party. My dear hubby works shift work and with shift work comes a lot of time by myself, and when he's at work I like to sew.
Wednesday, September 15, 2010
Sewing Room (before reno)

above: before sewing room reno


(left: purchased used cabinets right: emptied sewing room space)
I haven't been sewing much lately because for the past month I have been busy working on my new sewing room. I have enlisted the help of my dear hubby to complete this huge project. (Everything is a huge undertaking when caring for a 2 year old and 5 month old) I have longed for a sewing room for a few years now but never did I think I would actually get a personalized space just for me to sew and craft in. I knew what I wanted. Storage, storage and more storage.
I really like the storage solutions from ikea. But every time I found something I really liked, it proved to be too much money for me to do (once you add it all up ikea stuff costs a fortunate).
Cabinets:
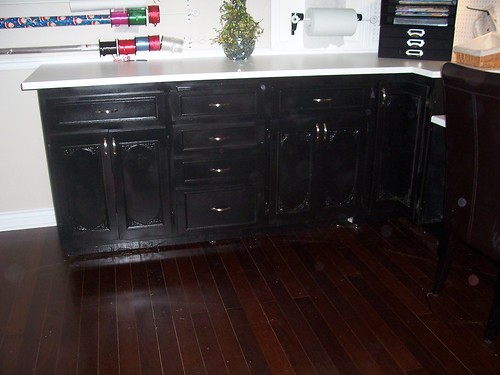
After deciding to become a stay-at-home, my hubby and I have been buying used, so for over a year now I have been searching the classifieds for used kitchen cabinets. I don't know exactly what inspired me to look for used kitchen cupboards for my craft room but I'm sure glad I did. I was able to get all the cabinets that were in the picture above for $75 which is about the cost of one of those cheap Canadian tire cabinets on sale. Okay I know they are fugly beyond words. But they had amazing potential. I wanted to painted them. wow was that a challenge! I first attempted to paint one with a brush and it turned out horrid. Then I realized that we had a paint sprayer for my hubby's air compressor. So we tried it and it didn't go that great at first. (Not only did we have our 2 little ones, are neighbour was driving us nuts to being all nosy and crap! I wanted to tell him to leave us alone! I was embarrassed enough that we were yelling at each other (as we were so stressed with the little ones and trying to get the stupid thing to work on one of the hottest days of the year). It took us a while to figure out the correct pressure to put the sprayer at so that it wasn't coming out all clumpy but once we did it was easy sailing, and we all calmed down. I'm so glad that we spray painted it instead of using a brush, not only would it have taken hours to do it by hand it would have left those unsightly brush strokes that I despise!
Hardware:
I removed all the hardware before painting and patched the holes from the hardware. As I suspected, the patch was visible after painting was complete. So I wanted to wallpaper the centre of them in a modern black and white wallpaper. The new hardware I picked out is stainless steel which is a great contrast to the cabinets that we painted black.
Countertops:
I wanted to do some type of painting effect to the countertop but realized that it just would have cost too much for the supplies to do it, plus there wasn't enough countertop for what I needed. So I purchased white countertops from ikea. They were each $60. I used 1.5 of them for the countertops of the base cupboards, one is for all of my machines to sit. and the left over piece is just big enough to make into a cutting table. I haven't yet decided on whether or not to put legs (from ikea) on the cutting table or to purchase a used piece of furniture for more added storage. The cost is proving to be about the same.
Lighting:
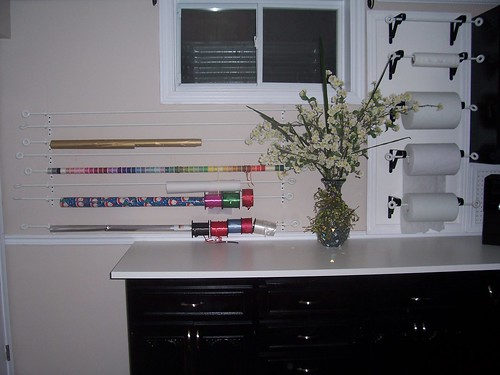
It was very dark downstairs, especially at 11pm ! I found some pot lights "grundtal" that we purchased from ikea a few years ago, but never bugged dear hubby to put them up (sometimes you have to pick and chose when to bug them! LOL) So I purchased two more packages of them. My hubby was really skeptical about putting them up because they have all these wires running everywhere. But we solved that with more added Pegboard.
Pegboard:
A couple of months ago I purchased some pegboard which I found on kijiji. It was $8 per sheet which a steal when you compare it to $20 + a sheet at home depot and lowes. We bought 4 of them. My hubby put up a huge wall of pegboard. It looked so pretty as he even trimmed it all in and painted it white. So with the left over pegboard he installed it under the cabinets for more hooks and also to hide the lighting wires underneath. All that is left is to trim it all in!
Embroidery wall and wrapping paper center:
I have rolls of embroidery that take up a ton of room so dear hubby attached a left over piece of mdf to the wall (because we only have 24" centres for studs not the usual 12" or 16" centres.) so that I could attached something for my embroidery rolls to hang on. The problem with rolls of embroidery stabilizers is that they're depths are bigger than paper towels holders. So I found that the brackets used for plant hangers would be not only stylish but also would protrude far enough for my stabilizer rolls to hang off of. A few months back, I came across a wrapping paper centre (I think it was lowes that had a how -to) I loved the idea of having all of my wrapping paper in one place, as too many times I have had crushed/torn/mangled rolls of wrapping paper. The tutorial called for cafe rods which are used for curtains. Well, the cheapest cafe rods that I found were $10 a pop. So I found some curtain rods at ikea for $1.97 each. The diameter of the rod is prefect size for not only wrapping paper but also rolls of ribbon. They are steel so they will also hold the weight of rolls of ribbon too! I will get dear hubby to cut some of them as the dowels for the embroidery stabilizers.
The new craft room is coming along nicely. Never in my wildest dream did I think that this was attainable for a modest budget. This weekend we hope to complete the sewing room. I can't wait as I have so many projects I have to start.
Sunday, September 12, 2010
Hand Drafted Wallet for Grandma


Here's the wallet that I drafted for my mother-in-law for her birthday, after purchasing a pattern, that I really didn't like at all. It features a outside zipper, monogramed exterior, 2 photo slots, money holder and card holder. I loved how it turned out.
Subscribe to:
Posts (Atom)